Introduction
This article explains how to create a zip file in ASP.NET using C#. First we download Ionic.Zip.dll from the following link or attachment.
The following is the procedure.
Step 1
Open
Visual Studio 2012 and click "File" -> "New" -> "Web site...". A
window is opened. In this window, click "Empty Web Site Application"
under Visual C#.
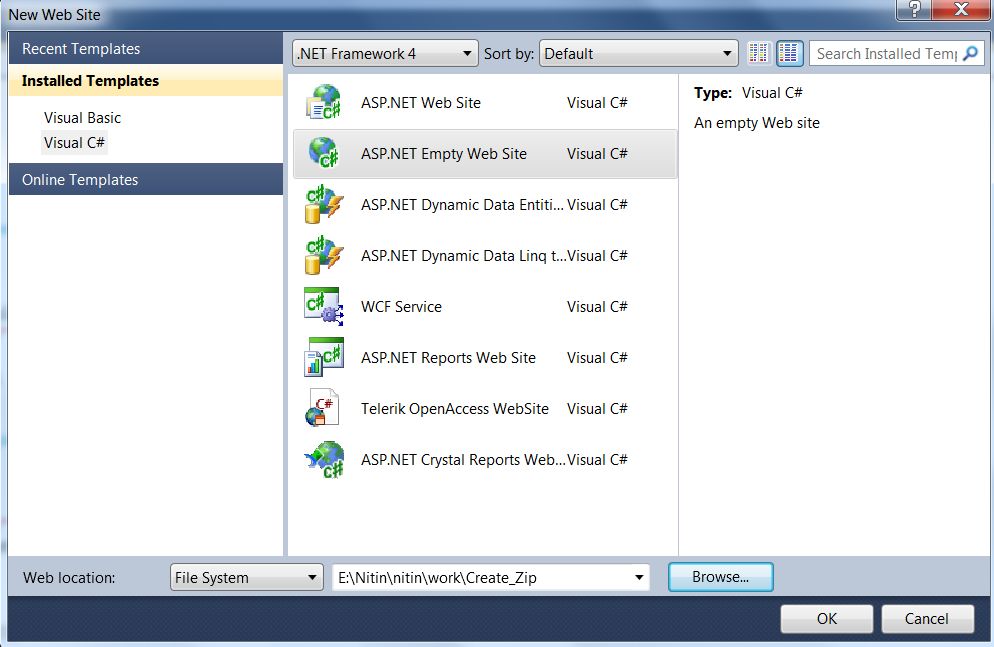
Give your application the name "Create_Zip" and then click "Ok".
Step 2
Now we will need add a DLL to our website, check the following steps.
Go
to Solution Explorer then right-click on the "References" node of the
solution then go to "Add Reference" then go to the Browse tab then
select the DLL.
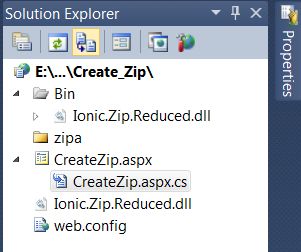
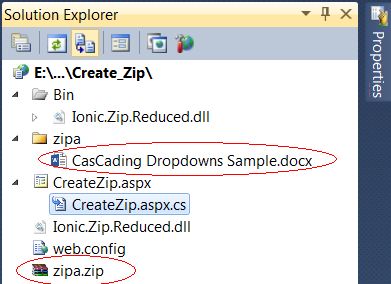
Now a bin folder is added to our Web Site and place Ionic.Zip.dll in this folder and add another folder to your application. Right-click on your Web Site then select "New folder" and give it the name "Zipa". Our Web Site will be like this:
Complete Program
CreateZip.aspx
<%@ Page Language="C#" AutoEventWireup="true" CodeFile="CreateZip.aspx.cs" Inherits="CreateZip" %>
<!DOCTYPE html PUBLIC "-//W3C//DTD XHTML 1.0 Transitional//EN" "http://www.w3.org/TR/xhtml1/DTD/xhtml1-transitional.dtd">
<html xmlns="http://www.w3.org/1999/xhtml">
<head runat="server">
<title></title>
</head>
<body>
<form id="form1" runat="server">
<h3 style="color: #0000FF; font-style: italic"> Create Zip in ASP.NET</h3>
<div style="height: 121px">
<asp:FileUpload ID="FileUpload" runat="server" />
<br />
<br />
<asp:Button ID="bttnupload" runat="server" Text="Upload File" Font-Bold="True"
onclick="bttnupload_Click" />
<asp:Button ID="bttnzip" runat="server" Text="Create Zip" Font-Bold="True"
onclick="bttnzip_Click" />
<br />
<br />
<asp:Label ID="lbltxt" runat="server" ForeColor="#CC0000"></asp:Label>
</div>
</form>
</body>
</html>
CreateZip.aspx.cs
using System;
using System.Collections.Generic;
using System.Linq;
using System.Web;
using System.Web.UI;
using System.Web.UI.WebControls;
using Ionic.Zip;
using System.IO;
public partial class CreateZip : System.Web.UI.Page
{
protected void Page_Load(object sender, EventArgs e)
{
}
protected void bttnupload_Click(object sender, EventArgs e)
{
if (FileUpload.HasFile)
{
string filename = Path.GetFileName(FileUpload.PostedFile.FileName);
string pathname = Server.MapPath("~/zipa/" + filename);
FileUpload.SaveAs(pathname);
lbltxt.Text = "File Upload Successfully";
}
}
protected void bttnzip_Click(object sender, EventArgs e)
{
try
{
string pathname = Server.MapPath("~/zipa/");
string[] filename = Directory.GetFiles(pathname);
using (ZipFile zip = new ZipFile())
{
zip.AddFiles(filename, "file");
zip.Save(Server.MapPath("~/zipa.zip"));
lbltxt.Text = "Zip File Created";
}
}
catch (Exception ex)
{
lbltxt.Text = ex.Message;
}
}
}
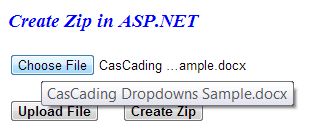
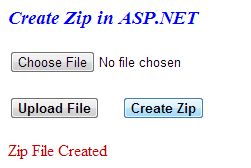
Output 1

Click on "Choose File" and select any file from any drive.
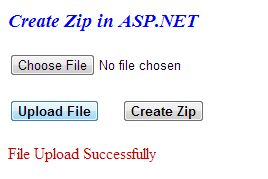
Output 2
Click on the "Upload" Button.
Output 3
Now click on the "Create Zip" button.
Output 4
Now see that the Solution Explorer contains a Zip folder.


No comments:
Post a Comment